
You’ve planned an incredible event and you’re ready to start selling tickets. The best way to do that is to create your event page on Passage.
Your event page can make or break ticket sales for your event because it does the heavy lifting when it comes to converting sales: your marketing & advertising campaigns and social media efforts can all help to get more eyeballs on your event, but it’s the graphics, copy, and calls to action on the event page that work together to convert those into sales.
Follow these 5 tips to make your event page appealing, informative, and search-friendly so that you can reach more fans and sell more tickets.
1. Event Description
Let’s start with the basics. Guests may land on your event page from your website, social media pages, from a search engine, or by searching on GoPassage.com. Your event page should include all the details they need to know, regardless of where the traffic is coming from.
Start with the name of your event. This will appear as the title of your event page. Then, craft a succinct, one-sentence introduction that will draw readers in and make them want to know more. Let’s say you’re running a haunted attraction called Pitch Black; your introduction might read something like this:
Enter Pitch Black if you dare!
We’ve been rated the scariest haunted attraction this side of Mississippi. Come see if you agree! With 45,000 feet of winding passages through blackness, over twenty-five unique animatronic creatures, and scenes straight from your most dreaded nightmares, we dare you to escape alive.
You may also want to include some FAQs in your event description, or link to an FAQ page on your website so ticket purchasers can find all the information they need to help their visit go smoothly.

2. Graphics
The visual identity of your event is important. And it starts on your ticketing page.
Eye-catching images can help give ticket purchasers a sense of what they can expect when they arrive at your event. What kind of vibe will it have? What kind of atmosphere are you trying to create?
On Passage, there are four different types of images or graphics you should add to your event page, including:
Event Poster or Graphic: The event poster is the most important graphic for your event. It will be seen on the event page, customer tickets, the public event search, and also will be the graphic used if sharing your link on social media. You may upload up to 4 images for your event.
Multiple event posters will display in a slideshow on your event page If multiple uploads, check the “Use as Event Poster” box for the image you want to print on customers’ tickets. Square images are recommended, but a 3:4 ratio (taller than wide) also fits the space well. This image will never display over 400 pixels wide, so does not need to be super hi-res.

Banner Image: This image will display on the event page above the title. The optimal width is 800 pixels. There is no maximum height, but it’s recommended to use a more horizontal image here (200-250 pixels tall) to avoid pushing other description details far down the page. The banner image is a great way to highlight a special promotion or a sponsor.
Background Image: Personalize your page with a custom background. Background images will be scaled to fit each user’s screen, but generally recommend uploading an image around 1600 pixels wide and at least half that tall.

Sponsor Image: Uploaded in the advanced options of your venue, the sponsor image will display at the bottom of custom tickets. For the best display of your sponsor image on the ticket upload your image at 460 pixels wide by 200 pixels tall.
All images must be less than 2 MB and uploaded in either JPG or PNG format.

3. Refund Policy
We always recommend an all-sales-are-final policy for your tickets to events. This helps protect you in case of inclement weather or other minor inconveniences that might cause guests to request refunds. You can always make exceptions to that policy on a case-by-case basis, but explaining the policy right on your ticketing page helps set expectations and reduce the number of refunds you may need to complete. Guests can also transfer their tickets to another person if they are unable to attend for any reason.
Refund Policies can be added to the Policies section of your Venue setup, under “Advanced Options”. Be sure to add a cancellation policy to this section as well, detailing what guests can expect in the event you need to cancel your event.
Need help setting up your event page on Passage? Schedule an onboarding call with our concierge support team. We’ll set everything up for you!


4. Tags
A new feature we added this year allows ticket purchasers to search for events not only by name, venue, or location but by tags which helps to filter their search results by interest. Whatever categories apply to your event, add a tag to make it easier for the millions of fans who are searching for events on GoPassage.com to find you.
There are tons of options when it comes to how to tag your event. Just a few of the categories include:
- Amusement Park
- Attraction
- Baseball
- Basketball
- Benefit Concert
- Character Convention
- Comedy
- Concert
- Cooking
- Escape Room
- Food and Drink
- Football
- Fundraising
- Haunted Attraction
- Holiday Event
- Live Music
- Murder Mystery
- Musical Theater
- Nightlife
- Networking
- Non-Profit
- Singles Event
- Soccer
- Sports
- Virtual Event
- Yoga
There are also tags that describe some of the amenities or specific needs guests may have when searching for events they want to attend, such as:
- Animals Welcome
- Wheelchair Accessible
- Cocktails Available
- Family Friendly
- Fundraising
- Indoors
- Parking On-Site
- Sign Language Available
You can add multiple tags to your event! Hosting a semi-pro soccer game with on-site parking, concessions, and accessible facilities? Add “soccer”, “sports”, “semi-pro”, “parking on-site”, and “handicap accessible” tags to your ticketing page. You might also want to add tags like “family-friendly”, “beer available”, or “food available”. Guests looking for accessible, family-friendly events in their area will see your games in their search results.

5. Social Discounts and Promo Codes
Once you’ve got the event details nailed down, supercharge your ticket sales by adding some marketing tools to your event.
Each of your followers is connected with hundreds (or maybe even thousands) of people on their own profiles. Wouldn’t you like to reach the people they’re connected with, too? Social media discounts are deals offered to customers in exchange for sharing your event information on social networks like Facebook and Twitter. Guests receive a coupon or promo code immediately usable for their current purchase. It’s a cost-effective way to amplify your marketing efforts and reach more fans.
To set up a social discount, head over to your events section and select “Social Discount” from the Select an Option dropdown menu on your event.
Promo Codes are another great tool that’s already built into your Passage account. Use these to track which of your marketing efforts are bringing in the most traffic by creating a unique code for each campaign. You can create as many promo codes as you like!
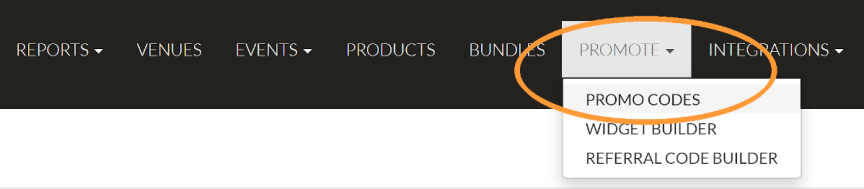
To create a promo code, click the Promote tab at the top of the admin area and select “Promo Codes” from the listed options. This will take you to the page to create a new promo code.
BONUS: Add a Virtual Queue
Alleviate bottlenecks at your venue’s entrance and give guests more flexibility while they wait for their turn to enter by adding a virtual queue to your event page.
Virtual queues give you more control to manage the crowd flow at your event and help you maximize the (reduced) capacity of your venue without putting your staff or your guests at risk.
Here’s how they work, in a nutshell:
- When guests arrive at your event or venue, they’ll be “checked in” to your virtual queue.
- You determine how many guests you want to allow to enter your venue at a time.
- Guests are notified via SMS text when it’s their turn to enter. As they enter, you check them off the virtual queue, allowing the next group of virtual queuers to be notified.
To set up a virtual queue open the “Select an Option” dropdown menu on your event, and choose “Virtual Queues” from the list. Then, click the “New Queue” button to open the setup page.

Need help setting up your event page on Passage? Schedule an onboarding call with our concierge support team. We’ll set everything up for you!