
The way we do events has totally changed. Now, in-person gatherings are just one of the many event types available for producers to choose from. And let’s be honest, this is AMAZING! Have you ever thought about it?
Picture this. Some guests might not be comfortable with massive in-person events right now or they might want to join your event from a different city or state. And what if your guests would rather watch your show, festival, or talk, right from the comfort of their couches? Whatever the reason, you can now choose to host virtual events (or even hybrid ones).
We all know the pandemic has affected the event industry. But it has also brought us an opportunity. Event livestreams give you the power to reconnect directly with your customers, fans, and supporters in a way that wasn’t possible before. First, people who live far away from your location can still be guests at your online event. And second, you’re also giving the ones who live next door the option to choose to be there in-person or virtually. Everybody wins! But, if you still have doubts, check our blog on why you should think about adding virtual access to your in-person event.
Although livestreaming is simple enough for anyone to do, it’s not quite as easy as opening up your laptop and hitting a “go live” button. You’ll want to put some planning and effort into making your virtual event special, just like you would if you were hosting an in-person event.
You know we’re here to help, so here is our six-step guide on how to easily livestream an event. Let’s get started!
1. Create an Event
Whether it’s a virtual or hybrid event, the first thing to do before choosing to livestream an event is to plan a great event. Creating events with Passage is a piece of cake.
First, you just need to add some event details. Your event name and accurate description will be key for your future guests to know what your event is going to be about or who’ll be there. We also recommend adding an event category(s) to increase your event’s visibility.
Then, you can customize the look and feel of your event page, from images, to what type of information you want to display. Put your guests first and try to make your event page as useful and informative as possible.
And last but not least, you can choose different ticket types and time slots depending on your event’s needs. Do you want to host recurring virtual events? Do you want to limit the number of tickets that can be sold for a specific time slot? Or do you want to let your guests transfer their tickets? You can do all this and more with Passage’s ticketing software.

2. Add Virtual Access
Once your initial event is set up, you need to add a virtual component to be able to start your event livestream. But don’t worry! Everything stays inside Passage’s virtual event platform.
Head over to your Manage Events admin page, open the “Select an Option” dropdown menu on the event, and select “Virtual Access” from the list. This takes you to the form to set up your virtual event page.
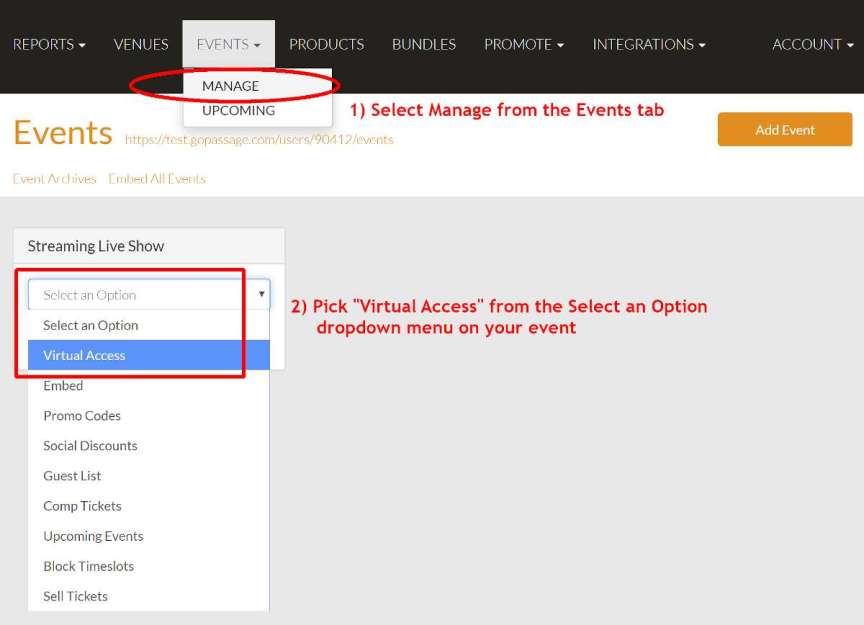
In the “Description” section, add any details you’d like to include on the page along with the livestream. Your description will display below the embedded content. You can include text, images, or links.
Yes, it’s that simple!
3. Choose Your Streaming Service
Your setup is almost ready!
To livestream an event, the simplest option is to use Passage’s built-in livestream platform. When you select this option:
- You’ll have fewer technology components to manage.
- No embed code to copy over.
- Everything will be on one platform.
Passage Streaming can support up to 1080p Full HD streaming to make sure you also have the best stream quality possible.
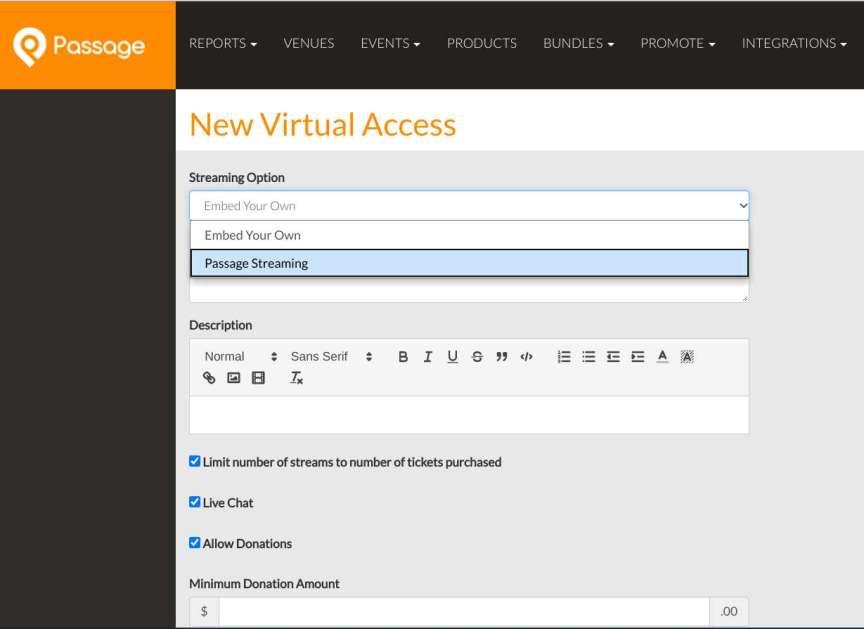
When you save the virtual access settings, after selecting Passage Streaming as your platform, you will be provided with:
- A Stream URL,
- A Stream Name/Key,
- Login and Password.
These can be input as a custom RTMP destination into a streaming encoder such as Open Broadcaster Software (OBS), StreamYard, or Restream.io which allow you to fully produce your stream. Connecting the Passage Streaming ID elements lets you keep your stream fully secure. Needless to say, our platform is completely agnostic, so you can plug in any encoder when using Passage Streaming service.
However, if you’re more comfortable with another livestream platform (such as Youtube, Vimeo, Twitch, or Zoom) you’re more than welcome to use it. We can still protect access and make sure only ticket purchasers can get to your streaming page.
If you are streaming to another livestream platform, you’ll need to copy the embed code from that viewer to your Virtual Access settings page on Passage. When embedding your stream:
- We recommend setting the width to “100%” in your code to look best on all devices.
- For YouTube videos, add “?playsinline=1” (without the quotes) to the end of your video URL to prevent the video from taking over the full screen.
If you have doubts about which streaming service you should use, check our blog and discover the pros and cons of different live streaming platforms.
4. Activate Optional Features
When choosing Passage as your virtual event partner, there’re many features available for you to turn on or off during your event livestream.
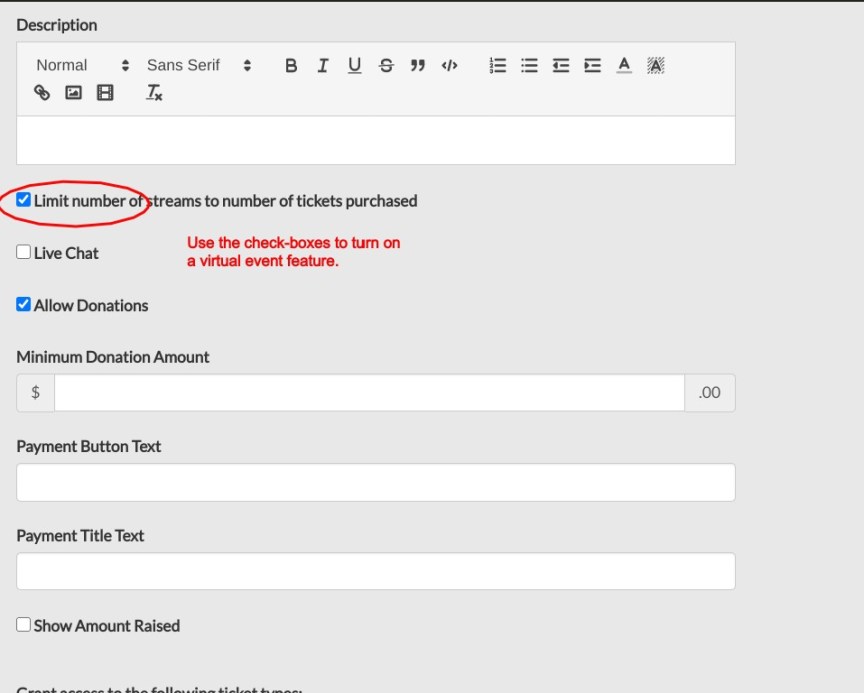
Limit number of streams to number of tickets purchased
We recommend turning this feature on if you want to enforce a paywall for your event. When selected, a user will only be able to open as many streams as they purchased. If not selected, a user could login and stream from as many devices/browser sessions as they want.
Live Chat
Live Chats are GREAT for interacting with your fans who are watching your show from home. Don’t let virtuality keep you away from your guests! Host Q&A sessions or give shoutouts to virtual attendees during your event livestream.
When activated, the Live Chat will appear to the right of the streaming video on desktop, or below the stream on mobile.
5. Grant Access
With Passage’s event ticketing platform, you can easily provide multiple access types for a single event. You can sell tickets online for your hybrid event and let your guests choose if they want virtual or in-person access.
When granting access to your event livestream, you can select which ticket types will provide a link to the virtual event page when purchased. For example, you can sell a ‘General Admission’ ticket type (not selected) for people to attend the show in person, and an ‘Online Admission’ (selected) for people who cannot attend or who would prefer to watch from home.
What’s more, our event ticketing system allows you to charge different ticket prices for each access type. This gives you the total freedom to choose if you want virtual access tickets to be cheaper than in-person ones, or vice versa.
6. Go further!
You now know the basics to livestream an event with Passage, but you can go beyond that.
Have you thought about re-broadcasting your virtual event? You can record your event livestream and continue selling access to it after the event ends. Our Video-On-Demand feature allows your fans to watch your content whenever and wherever they want, but it also lets you keep earning revenue once your livestream is over.
If you want to learn more about how to take your event livestream to the extra mile, check our blog that covers some tips and tricks to delight your virtual audience.
Now you’re ready to live stream! If you want to see the steps above in action, check our explanatory video below:
Need help setting up your event livestream? Schedule a call with our support team. We’ll walk you through it, or set everything up for you!